MainActivity
...더보기
|
1
2
3
4
5
6
7
8
9
10
11
12
13
14
15
16
17
18
19
20
21
22
23
24
25
26
27
28
29
30
31
32
33
34
35
36
37
38
39
40
41
42
43
|
package com.example.boostcoursepractice;
import androidx.appcompat.app.AlertDialog;
import androidx.appcompat.app.AppCompatActivity;
import android.content.Context;
import android.content.DialogInterface;
import android.os.Bundle;
import android.view.LayoutInflater;
import android.view.View;
import android.widget.Button;
import android.widget.FrameLayout;
import android.widget.TextView;
import com.google.android.material.snackbar.Snackbar;
import org.w3c.dom.Text;
public class MainActivity extends AppCompatActivity {
FrameLayout container ;
@Override
protected void onCreate(Bundle savedInstanceState) {
super.onCreate(savedInstanceState);
setContentView(R.layout.activity_main);
container = (FrameLayout) findViewById(R.id.container);
Button btn = (Button) findViewById(R.id.button);
btn.setOnClickListener(new View.OnClickListener() {
@Override
public void onClick(View view) {
LayoutInflater layoutInflater = (LayoutInflater) getSystemService(Context.LAYOUT_INFLATER_SERVICE);
layoutInflater.inflate(R.layout.sum1, container, true);
}
});
}
}
|
cs |
activity_main.xml
...더보기
|
1
2
3
4
5
6
7
8
9
10
11
12
13
14
15
16
17
18
19
20
21
22
23
24
25
26
27
28
29
30
31
32
33
34
35
36
37
|
<?xml version="1.0" encoding="utf-8"?>
<androidx.constraintlayout.widget.ConstraintLayout xmlns:android="http://schemas.android.com/apk/res/android"
xmlns:app="http://schemas.android.com/apk/res-auto"
xmlns:tools="http://schemas.android.com/tools"
android:layout_width="match_parent"
android:layout_height="match_parent"
>
<Button
android:id="@+id/button"
android:layout_width="wrap_content"
android:layout_height="wrap_content"
android:text="Button"
app:layout_constraintBottom_toBottomOf="parent"
app:layout_constraintEnd_toEndOf="parent"
app:layout_constraintHorizontal_bias="0.151"
app:layout_constraintStart_toStartOf="parent"
app:layout_constraintTop_toTopOf="parent"
app:layout_constraintVertical_bias="0.023" />
<FrameLayout
android:id="@+id/container"
android:layout_width="0dp"
android:layout_height="0dp"
android:layout_marginStart="8dp"
android:layout_marginLeft="8dp"
android:layout_marginTop="8dp"
android:layout_marginEnd="8dp"
android:layout_marginRight="8dp"
app:layout_constraintBottom_toBottomOf="parent"
app:layout_constraintEnd_toEndOf="parent"
app:layout_constraintStart_toStartOf="parent"
app:layout_constraintTop_toBottomOf="@+id/button">
</FrameLayout>
</androidx.constraintlayout.widget.ConstraintLayout>
|
cs |
sum1.xml (sub1.xml 인데 이름 잘못 지었다...)
...더보기
|
1
2
3
4
5
6
7
8
9
10
11
12
13
14
15
16
17
18
19
20
|
<?xml version="1.0" encoding="utf-8"?>
<LinearLayout xmlns:android="http://schemas.android.com/apk/res/android"
android:layout_width="match_parent"
android:layout_height="match_parent"
android:background="@android:color/holo_blue_bright"
android:orientation="vertical">
<TextView
android:id="@+id/textView"
android:layout_width="match_parent"
android:layout_height="wrap_content"
android:text="부분화면"
android:textSize="40dp" />
<Button
android:id="@+id/button2"
android:layout_width="wrap_content"
android:layout_height="wrap_content"
android:text="Button" />
</LinearLayout>
|
cs |
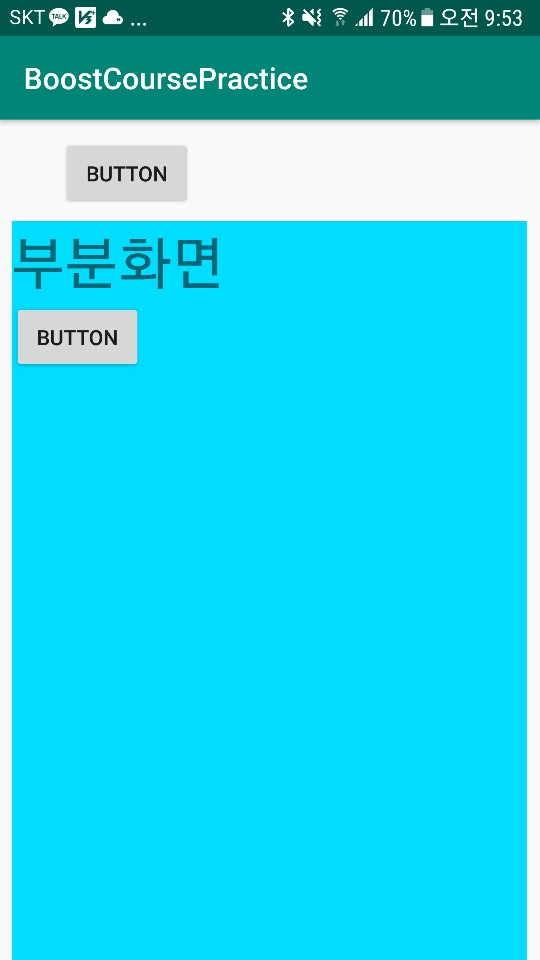
일단 기본적인 객체화 Inflation하는 방법은 다음과 같다
LayoutInflater layoutInflater = (LayoutInflater) getSystemService(Context.LAYOUT_INFLATER_SERVICE);
layoutInflater.inflate(R.layout.sum1, container, true);
inflate의 첫번째 인자는 어떤 것을 객체화 할 것인지 두번째인자는 어디에 객체화할 것인지 세번째 인자는 바로 붙일 것인지를 나타낸다.
'2019 summer 부스트코스 에이스(안드로이드 프로그래밍) > 2. 이벤트와 리스트뷰' 카테고리의 다른 글
| 2-6-3 그리드뷰 사용하기 (0) | 2019.07.31 |
|---|---|
| 2-6-2 스피너 사용하기 (0) | 2019.07.31 |
| 2-4-2 비트맵 버튼 만들기 (0) | 2019.07.30 |
| 2-4-1 나인패치 이미지 (0) | 2019.07.30 |
| 2-3-2 알림 대화 상자 보여주기 (0) | 2019.07.30 |