MainActivity

...더보기
1
2
3
4
5
6
7
8
9
10
11
12
13
14
15
16
17
18
19
20
21
22
23
24
25
26
27
28
29
30
31
32
33
34
35
36
37
38
39
40
41
42
43
44
45
46
47
48
49
50
51
52
53
54
55
56
57
58
59
60
61
62
63
64
65
66
67
68
69
70
71
72
73
74
75
76
77
78
79
80
81
82
83
84
85
86
87
88
89
90
91
92
93
94
95
96
97
98
99
100
101
102
103
104
105
106
107
108
109
110
111
112
113
package com.example.test;
 
import androidx.appcompat.app.AppCompatActivity;
 
import android.os.Bundle;
import android.view.View;
import android.view.ViewGroup;
import android.widget.AdapterView;
import android.widget.BaseAdapter;
import android.widget.Button;
import android.widget.EditText;
import android.widget.ListView;
import android.widget.Toast;
 
import java.util.ArrayList;
 
public class MainActivity extends AppCompatActivity {
 
    SingerAdapter adapter;
    EditText nameEdit;
    EditText mobileEdit;
    Button button ;
 
    @Override
    protected void onCreate(Bundle savedInstanceState) {
        super.onCreate(savedInstanceState);
        setContentView(R.layout.activity_main);
 
        ListView listView = (ListView) findViewById(R.id.lv);
        nameEdit = (EditText) findViewById(R.id.name_edit);
        mobileEdit = (EditText) findViewById(R.id.mobile_edit);
        button = (Button) findViewById(R.id.button);
 
        adapter = new SingerAdapter();
 
        adapter.addItem(new SingerItem("장주느""010-5212-7024", R.drawable.ic_launcher_background));
        adapter.addItem(new SingerItem("장주느1""010-52024", R.drawable.ic_launcher_background));
        adapter.addItem(new SingerItem("장주느2""010-51-7024", R.drawable.ic_launcher_background));
        adapter.addItem(new SingerItem("장주느3""0-5-7024", R.drawable.ic_launcher_background));
        adapter.addItem(new SingerItem("장주4""010-59-7024", R.drawable.ic_launcher_background));
        adapter.addItem(new SingerItem("장주5""-52 -7024", R.drawable.ic_launcher_background));
 
 
        listView.setAdapter(adapter);
        listView.setOnItemClickListener(new AdapterView.OnItemClickListener() {
            @Override
            public void onItemClick(AdapterView<?> adapterView, View view, int i, long l) {
                SingerItem item = (SingerItem) adapter.getItem(i);
                Toast.makeText(getApplicationContext(), item.toString(), Toast.LENGTH_LONG).show();
            }
        });
 
        button.setOnClickListener(new View.OnClickListener() {
            @Override
            public void onClick(View view) {
                String name = nameEdit.getText().toString();
                String mobile = mobileEdit.getText().toString();
 
                SingerItem item = new SingerItem(name, mobile, R.drawable.ic_launcher_foreground);
 
                adapter.addItem(item);
                adapter.notifyDataSetChanged();
            }
        });
    }
 
    class SingerAdapter extends BaseAdapter
    {
        ArrayList<SingerItem> items = new ArrayList<SingerItem>() ;
 
        public void addItem(SingerItem item)
        {
            items.add(item);
        }
 
        @Override
        public int getCount() {
            return items.size();
        }
 
        @Override
        public Object getItem(int i) {
            return items.get(i);
        }
 
        @Override
        public long getItemId(int i) {
            return i;
        }
 
        @Override
        public View getView(int i, View view, ViewGroup viewGroup) {
            SingerItemView singerItemView = null ;
 
            if(view == null)
            {
                 singerItemView = new SingerItemView(getApplicationContext());
            }
            else
            {
                singerItemView = (SingerItemView) view;
            }
 
            SingerItem item = items.get(i) ;
            singerItemView.setName(item.getName());
            singerItemView.setMobile(item.getMobile());
            singerItemView.setImg(item.getResID());
 
            return singerItemView;
        }
    }
 
}
cs


SingerItem

...더보기
1
2
3
4
5
6
7
8
9
10
11
12
13
14
15
16
17
18
19
20
21
22
23
24
25
26
27
28
29
30
31
32
33
34
35
36
package com.example.test;
 
public class SingerItem {
    private String name ;
    private String mobile ;
    private int resID ;
 
    public SingerItem(String name, String mobile, int resID) {
        this.name = name;
        this.mobile = mobile;
        this.resID = resID ;
    }
 
    public String getName() {
        return name;
    }
 
    public String getMobile() {
        return mobile;
    }
 
    public int getResID()
    {
        return resID ;
    }
 
    @Override
    public String toString() {
        return "SingerItem{" +
                "name='" + name + '\'' +
                ", mobile='" + mobile + '\'' +
                ", resID=" + resID +
                '}';
    }
}
 
cs


SingerItemView

...더보기
1
2
3
4
5
6
7
8
9
10
11
12
13
14
15
16
17
18
19
20
21
22
23
24
25
26
27
28
29
30
31
32
33
34
35
36
37
38
39
40
41
42
43
44
45
46
47
48
49
50
51
52
53
package com.example.test;
 
import android.content.Context;
import android.util.AttributeSet;
import android.view.LayoutInflater;
import android.widget.ImageView;
import android.widget.LinearLayout;
import android.widget.TextView;
 
public class SingerItemView extends LinearLayout {
 
    TextView textView;
    TextView textView2;
    ImageView img;
 
    public SingerItemView(Context context) {
        super(context);
 
        init(context);
    }
 
    public SingerItemView(Context context, AttributeSet attrs) {
        super(context, attrs);
 
        init(context);
    }
 
    private void init(Context context)
    {
        LayoutInflater inflater = (LayoutInflater) context.getSystemService(Context.LAYOUT_INFLATER_SERVICE);
        inflater.inflate(R.layout.singer_item_view, thistrue);
 
///아래의 방식으로도 인플레이트 할 수 있다.
//View.inflate(getContext() ,R.layout.singer_item_view, this);
 
        textView = findViewById(R.id.tv);
        textView2 = findViewById(R.id.tv2) ;
        img = findViewById(R.id.img) ;
    }
 
    public void setName(String name)
    {
        textView.setText(name);
    }
 
    public void setMobile(String mobile)
    {
        textView2.setText(mobile);
    }
 
    public void setImg(int resID)
    {
        img.setImageResource(resID);
    }
}
 
cs


activity_main.xml

...더보기
1
2
3
4
5
6
7
8
9
10
11
12
13
14
15
16
17
18
19
20
21
22
23
24
25
26
27
28
29
30
31
32
33
34
35
36
37
38
39
40
41
<?xml version="1.0" encoding="utf-8"?>
<RelativeLayout xmlns:android="http://schemas.android.com/apk/res/android"
    android:layout_width="match_parent"
    android:layout_height="match_parent"
    android:orientation="vertical" >
 
    <LinearLayout
        android:layout_width="match_parent"
        android:layout_height="wrap_content"
        android:layout_alignParentBottom="false"
        android:orientation="vertical">
 
        <Button
            android:id="@+id/button"
            android:layout_width="match_parent"
            android:layout_height="wrap_content"
            android:text="추가" />
 
        <EditText
            android:id="@+id/name_edit"
            android:layout_width="match_parent"
            android:layout_height="wrap_content"
            android:ems="10"
            android:hint="이름"
            android:inputType="textPersonName" />
 
        <EditText
            android:id="@+id/mobile_edit"
            android:layout_width="match_parent"
            android:layout_height="wrap_content"
            android:ems="10"
            android:hint="전화번호"
            android:inputType="textPersonName" />
 
        <ListView
            android:id="@+id/lv"
            android:layout_width="match_parent"
            android:layout_height="match_parent"
            />
    </LinearLayout>
</RelativeLayout>
cs


singer_item_view.xml

...더보기
1
2
3
4
5
6
7
8
9
10
11
12
13
14
15
16
17
18
19
20
21
22
23
24
25
26
27
28
29
30
31
32
33
34
35
36
37
38
<?xml version="1.0" encoding="utf-8"?>
<LinearLayout xmlns:android="http://schemas.android.com/apk/res/android"
    android:orientation="horizontal"
    android:layout_width="match_parent"
    android:layout_height="wrap_content">
 
    <ImageView
        android:id="@+id/img"
        android:layout_width="80dp"
        android:layout_height="80dp"
        android:src="@mipmap/ic_launcher" />
 
    <LinearLayout
        android:layout_width="match_parent"
        android:layout_height="match_parent"
        android:layout_marginLeft="6dp"
        android:orientation="vertical">
 
        <TextView
            android:id="@+id/tv"
            android:layout_width="match_parent"
            android:layout_height="wrap_content"
            android:text="이름"
            android:textColor="@color/colorPrimaryDark"
            android:textSize="30dp" />
 
        <TextView
            android:id="@+id/tv2"
            android:layout_width="match_parent"
            android:layout_height="wrap_content"
            android:layout_marginTop="6dp"
            android:text="전화번호"
            android:textColor="@android:color/holo_orange_dark"
            android:textSize="24dp" />
 
    </LinearLayout>
 
</LinearLayout>
cs


기본 원리는 리스트뷰에 어댑터를 등록하고 어댑터의 안의

ArrayList<SingerItem> items = new ArrayList<SingerItem>() 로 배열을 선언하고

public View getView(int i, View view, ViewGroup viewGroup)을 등록하여 내가 만든 return singerItemView; 을 리턴하여 아이템 항목을 보여주는 식이다. 


singerItemView는 singer_item_view.xml과 연결되어 있다. 


아래와 같이 클릭리스너를 등록해 리스트의 몇번째 아이템 항목이 선택되었는지를 알수 있다. 

listView.setOnItemClickListener(new AdapterView.OnItemClickListener() {

            @Override

            public void onItemClick(AdapterView<?> adapterView, View view, int i, long l) {

                SingerItem item = (SingerItem) adapter.getItem(i);

                Toast.makeText(getApplicationContext(), item.toString(), Toast.LENGTH_LONG).show();

            }

        });


다음은 버튼을 클릭하여 리스트의 아이템 항목을 추가하는 것인데

  button.setOnClickListener(new View.OnClickListener() {

            @Override

            public void onClick(View view) {

                String name = nameEdit.getText().toString();

                String mobile = mobileEdit.getText().toString();


                SingerItem item = new SingerItem(name, mobile, R.drawable.ic_launcher_foreground);


                adapter.addItem(item);

                adapter.notifyDataSetChanged();

            }

        });

위처럼  adapter.notifyDataSetChanged(); 를 호출하여 어댑터에 변화가 있다고 알려줘야 한다.


마지막으로

 public View getView(int i, View view, ViewGroup viewGroup) {

            SingerItemView singerItemView = null ;


            if(view == null)

            {

                 singerItemView = new SingerItemView(getApplicationContext());

            }

            else

            {

                singerItemView = (SingerItemView) view;

            }

getView에서 view가 null이 아닐 때 즉 이전에 썼던 객체가 남아있을 때 객체를 더이상 생성하지 않고 재활용하여 객체가 생성되는 수를 줄여 빠르게 만들어 줄 수 있다.


결과 화면

#청춘부보상 #대장정 #13기 #대원모집 [ 청춘부보상 13기 대원모집 ] 🔥청춘부보상 대장정이란?🔥 #내일로 #세일즈 #기부 를 접목한 신개념 국토대장정입니다. 🚞 사회적경제 물품을 판매하며,  내일로를 이용해 4박5일간 전국을 돌아다니게 됩니다. 💰 세일즈를 해서 번 돈만으로 숙식 등 여행경비를 해결하고,  금액의 일부는 기부하는 사회적 가치를 실현하는 대장정입니다.


대학교를 다니면서 한번도 대외활동을 한 적이 없기에 마지막 4학년 2학기를 앞두고 도전한 청춘부보상 13기!!


정말 이번 기회를 놓치면 졸업이기 때문에 마지막 청춘이라 생각하고 자기소개서를 열심히 썼던 것 같다. 


결국

.

.

.

.

.

.

.

.

.

.

.

.

.


합격!!! 감동쓰..ㅜㅜㅜ


부푼 마음을 가지고 오티에 참석했다. 전북여성교육문화센터에서 진행되었는데 전주에 살면서도 한번도 가본적이 없어서 한참을 헤매었다... 입구에 들어서자 우리 동해팀 기획단 나연이가 안내를 해주었다.(이때는 이름도 몰랐지만ㅎㅎ)


1
2
3
4
5
6
7
8
9
10
11
12
13
14
15
16
17
18
19
20
21
22
23
24
25
26
27
28
29
30
31
32
33
34
35
36
37
38
39
40
41
42
43
44
45
46
47
48
49
50
51
52
53
54
55
56
57
58
59
60
61
62
63
64
65
66
67
68
69
70
71
72
73
74
75
76
77
78
79
80
81
82
83
84
85
86
87
88
89
90
91
92
93
94
95
96
97
98
99
100
101
102
103
104
105
106
107
108
109
110
111
112
113
114
package com.example.test;
 
import androidx.appcompat.app.AppCompatActivity;
 
import android.os.Bundle;
import android.view.GestureDetector;
import android.view.KeyEvent;
import android.view.MotionEvent;
import android.view.View;
import android.widget.TextView;
import android.widget.Toast;
 
public class MainActivity extends AppCompatActivity {
 
    TextView logTv;
    GestureDetector detector ;
 
    @Override
    protected void onCreate(Bundle savedInstanceState) {
        super.onCreate(savedInstanceState);
        setContentView(R.layout.activity_main);
 
        logTv = (TextView) findViewById(R.id.tv_log);
        detector = new GestureDetector(thisnew GestureDetector.OnGestureListener() {
            @Override
            public boolean onDown(MotionEvent motionEvent) {
                println("onDown 호출됨");
                return true;
            }
 
            @Override
            public void onShowPress(MotionEvent motionEvent) {
                println("onShowPress 호출됨");
            }
 
            @Override
            public boolean onSingleTapUp(MotionEvent motionEvent) {
                println("onSingleTapUp 호출됨");
                return true;
            }
 
            @Override
            public boolean onScroll(MotionEvent motionEvent, MotionEvent motionEvent1, float v, float v1) {
                println("onScroll 호출됨 " + v + " "+v1);
                return true;
            }
 
            @Override
            public void onLongPress(MotionEvent motionEvent) {
                println("onLongPress 호출됨");
            }
 
            @Override
            public boolean onFling(MotionEvent motionEvent, MotionEvent motionEvent1, float v, float v1) {
                println("onFling 호출됨" + v + " " + v1);
                return true;
            }
        });
 
        View view = findViewById(R.id.view) ;
        View view2 = findViewById(R.id.view2) ;
 
        view.setOnTouchListener(new View.OnTouchListener() {
            @Override
            public boolean onTouch(View view, MotionEvent motionEvent) {
                int action = motionEvent.getAction() ;
                float curX = motionEvent.getX() ;
                float cuxY = motionEvent.getY() ;
 
                if(action == MotionEvent.ACTION_DOWN)
                {
                    println("손가락 눌렸음 " + curX + " " + cuxY) ;
                }
 
                else if(action == MotionEvent.ACTION_MOVE)
                {
                    println("손가락 움직임 " + curX + " " + cuxY) ;
                }
 
                else if(action == MotionEvent.ACTION_UP)
                {
                    println("손가락 떼짐 " + curX + " " + cuxY) ;
                }
                return true;
            }
        });
 
        view2.setOnTouchListener(new View.OnTouchListener() {
            @Override
            public boolean onTouch(View view, MotionEvent motionEvent) {
                detector.onTouchEvent(motionEvent);
                return true;
            }
        });
    }
 
    public void println(String s)
    {
        logTv.append(s + "\n");
    }
 
    @Override
    public boolean onKeyDown(int keyCode, KeyEvent event) {
        if(keyCode == KeyEvent.KEYCODE_BACK)
        {
            Toast.makeText(this"back키가 눌렸습니다.", Toast.LENGTH_LONG).show();
 
            return true;
        }
 
        return false ;
    }
}
 
cs


view.setOnTouchListener(new View.OnTouchListener() {

            @Override

            public boolean onTouch(View view, MotionEvent motionEvent) {

        });


기본적으로 뷰의 터치 이벤트를 등록하는 방법이다. 리스너안의 onTouch메서드를 오버라이드 해주면 된다.


detector = new GestureDetector(thisnew GestureDetector.OnGestureListener() {

            @Override

            public boolean onDown(MotionEvent motionEvent) {

            }


            @Override

            public void onShowPress(MotionEvent motionEvent) {

            }


            @Override

            public boolean onSingleTapUp(MotionEvent motionEvent) {

            }


            @Override

            public boolean onScroll(MotionEvent motionEvent, MotionEvent motionEvent1, float v, float v1) {

            }


            @Override

            public void onLongPress(MotionEvent motionEvent) {

            }


            @Override

            public boolean onFling(MotionEvent motionEvent, MotionEvent motionEvent1, float v, float v1) {

            }

        });


터치 스크롤을 얼마나 빠르게 했나 등 세부적인 동작을 쉽게 해주는 클래스인 GestureDetector이다. 위 처럼 제스처디덱터의 객체를 만들어 주고 리스너를 등록해 메서드를 오버라이드 해준다. onFling의 v, v1은 속도를 나타낸다.

  view2.setOnTouchListener(new View.OnTouchListener() {

            @Override

            public boolean onTouch(View view, MotionEvent motionEvent) {

                detector.onTouchEvent(motionEvent);

                return true;

            }

        });

마지막으로 터치리스너의 onTouch메서드에 detector.onTouchEvent 메서드에 motionEvent를 넘겨 제스처를 동작시켜준다.


 @Override

    public boolean onKeyDown(int keyCode, KeyEvent event) {

        if(keyCode == KeyEvent.KEYCODE_BACK)

        {

            Toast.makeText(this"back키가 눌렸습니다.", Toast.LENGTH_LONG).show();


            return true;

        }


        return false ;

    }

onKeyDown는 키가 눌렸을 때 호출되는 메소드


마지막으로

1
2
3
4
5
6
7
8
9
10
11
12
13
14
<?xml version="1.0" encoding="utf-8"?>
<selector xmlns:android="http://schemas.android.com/apk/res/android">
 
<item
    android:state_focused="true"
    android:state_pressed="true"
    android:drawable="@drawable/red"
    />
 
<item
    android:drawable="@drawable/blue"
    />
 
</selector>
cs

이처럼 drawble폴더에 my_selecter.xml과 같이 xml파일을 만들어 selector를 이용해 foucused, pressed가 true일 때 즉 뷰가 눌렸을 때의 이미지와 보통 상태일 때의 이미지를 다르게 설정하고 뷰의 background속성을 @drawable/my_selecter로 지정해주면 동작한다.


1
2
3
4
5
6
7
8
9
10
11
12
13
14
15
16
17
18
19
20
21
22
23
24
25
26
27
28
29
30
31
32
33
34
35
36
37
38
39
40
41
42
43
<?xml version="1.0" encoding="utf-8"?>
<LinearLayout xmlns:android="http://schemas.android.com/apk/res/android"
    android:layout_width="match_parent"
    android:layout_height="match_parent"
    android:orientation="vertical" >
 
    <View
        android:id="@+id/view"
        android:layout_width="match_parent"
        android:layout_height="0dp"
        android:layout_weight="1"
        android:background="@android:color/holo_blue_bright"></View>
 
    <View
        android:id="@+id/view2"
        android:layout_width="match_parent"
        android:layout_height="0dp"
        android:layout_weight="1"
        android:background="@android:color/holo_orange_light"></View>
 
    <ScrollView
        android:id="@+id/view3"
        android:layout_width="match_parent"
        android:layout_height="0dp"
        android:layout_weight="1">
        
        <TextView
            android:id="@+id/tv_log"
            android:layout_width="match_parent"
            android:layout_height="match_parent" />
 
    </ScrollView>
 
    <EditText
        android:id="@+id/editText"
        android:layout_width="match_parent"
        android:layout_height="30dp"
        android:background="@drawable/my_selecter"
        android:ems="10"
        android:inputType="text" />
 
 
</LinearLayout>
cs

결과화면

1
2
3
4
5
6
7
8
9
10
11
12
13
<?xml version="1.0" encoding="utf-8"?>
<LinearLayout xmlns:android="http://schemas.android.com/apk/res/android"
    android:layout_width="match_parent"
    android:layout_height="match_parent"
    android:orientation="vertical" >
 
    <TextView
        android:id="@+id/textView"
        android:layout_width="match_parent"
        android:layout_height="wrap_content"
        android:textSize="80dp"
        android:text="안녕하세요\n안녕하세요\n안녕하세요\n안녕하세요\n안녕하세요\n안녕하세요\n안녕하세요\n안녕하세요\n안녕하세요\n안녕하세요\n안녕하세요\n안녕하세요\n안녕하세요\n안녕하세요\n안녕하세요\n안녕하세요\n안녕하세요\n안녕하세요\n안녕하세요" />
</LinearLayout>
cs


스크롤 뷰로 따로 위젯으로 구현되어 있고 그냥 그 안에 뷰들을 넣으면 된다.

1
2
3
4
5
6
7
8
9
10
11
12
13
14
15
16
17
18
19
20
21
22
23
24
25
26
27
28
29
30
31
32
33
34
35
36
37
38
39
40
41
<?xml version="1.0" encoding="utf-8"?>
<TableLayout xmlns:android="http://schemas.android.com/apk/res/android"
    android:layout_width="match_parent"
    android:layout_height="match_parent"
    android:stretchColumns="0,1,2">
 
    <TableRow
        android:layout_width="match_parent"
        android:layout_height="wrap_content">
 
        <TextView
            android:layout_height="wrap_content"
            android:layout_weight="wrap_content"
            android:text="이름 : " />
 
        <EditText
            android:layout_height="wrap_content"
            android:layout_span="2"
            android:layout_weight="wrap_content" />
 
    </TableRow>
 
    <TableRow
        android:layout_width="match_parent"
        android:layout_height="wrap_content">
 
        <Button
            android:layout_height="wrap_content"
            android:layout_column="1"
            android:layout_weight="wrap_content"
            android:text="예" />
 
        <Button
            android:layout_height="wrap_content"
            android:layout_column="2"
            android:layout_weight="wrap_content"
            android:text="아니오" />
 
    </TableRow>
 
</TableLayout>
cs


기본적으로 TableLayout안에 TableRow로 구성됨


android:stretchColumns="0,1,2" : 0,1,2번 컬럼(뷰)을 나머지 공간에 대하여 늘린다(가로) - 3등분 한다

android:layout_span="2" : 뷰가 2칸 크기만큼을 차지한다.

android:layout_column="1" : 뷰가 1번 칸에 들어간다.


결과 화면

첫번째 구현해야 할 것은 FIFO스케줄러이다. 일단 앞서 만들었던 mysched모듈이 FIFO로 되어 있기 때문에 유저프로그램인 test.c만 바꿔주면 된다.

<그림4 \home\ubuntu\v4.10\kernel\sched\mysched\test.c>


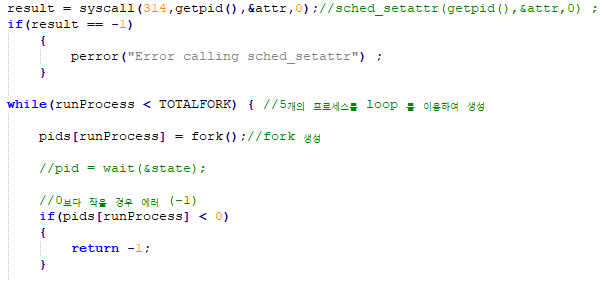
위 코드처럼 일단 syscall(314,getpid(),&attr,0)을 사용하여 우리가 만든 mysched모듈 스케줄러에 해당 프로세스를 넣어주었다. 그런 다음 TOTALFORK만큼(5define) 반복문을 돌려 5섯개의 자식 프로세스를 만들어 주었다. 이 때 각 자식 프로세스를 구별해주기 위하여 runProces라는 int형 변수를 두어 자식이 생성되면 하나씩 증가 시켜 0~4까지 번호를 매겼다. 또한 각 자식프로세스에 변수 t를 두어 그 안의 반복문의 계산이 한 번 끝나면 t를 증가시키고 그에 해당하는 설명(몇번째 프로세스가 몇 번째의 계산을 하고 있는가)printf하여 중간과정을 유저에게 알려주게끔 하였다. 마지막으로 t==3, 즉 계산이 3번 끝나면 break를 걸어 자식 프로세스가 종료되게 하였다.


<그림5 2-2결과>


그림5처럼 ./test를 실행시켜 원래 리눅스의 fair 스케줄로 작동 안하고 0번프로세스가 종료 되고 1번프로세스가 종료되고 이렇게 차례대로 실행되고 종료되면서 FIFO동작하고 있음을 볼 수 있다.


깃허브

https://github.com/icd0422/-Scheduling-algorithm-implementation-and-Context-switching-overhead-analysis


icd0422/-Scheduling-algorithm-implementation-and-Context-switching-overhead-analysis

Contribute to icd0422/-Scheduling-algorithm-implementation-and-Context-switching-overhead-analysis development by creating an account on GitHub.

github.com


<그림1 home\ubuntu\v4.10\kernel\sched\sched.h>


모듈를 집어 넣었을 때 fair 스케쥴의 .next를 변경해줘야 되기 때문에 위 그림처럼 extern const struct sched_class fair_sched_class;의 문장에서 const를 빼주었다.


<그림2 home\ubuntu\v4.10\kernel\sched\fair.c>

그리고 위와 같은 이유로 fair.c에 있는 fair 스케쥴에 대한 선언부와 정의부도 const를 빼줌으로써 .next의 변경을 자유롭게 해주었다.


<그림3 home\ubuntu\v4.10\kernel\sched\core.c>

위 그림을 설명하자면 우선 struct sched_class* classpointer를 선언해주었는데 이 변수는 나중에 sched_setattr()시스템 호출을 하면서 현재 수행되어지는 스케줄러를 내가 만든 스케줄러로 변경해야 되는데 그 스케줄러는 모듈로 되어 있어 커널과 모듈을 연결해주는 매개 변수의 역할을 하게 된다. 자세한 설명은 뒤에서 기술할 것이다. 그 다음으로는 mysched_usage라는 int형 변수인데 이 변수는 모듈이 들어왔는지 안 들어왔는지를 판별해주는 변수로서 0일 때는 안들어왔고 1일 때는 들어왔음을 의미한다. 그리고 이 두변수와 위에 기술된 나머지 스케줄클래스 변수들을 EXPORT_SYMBOL해줌으로써 모듈에서 그 변수를 쓸 수 있게 하였다.


<그림4 home\ubuntu\v4.10\kernel\sched\mysched\mysched.c>


다음으로는 모듈코드이다. Init할 때 mysched_usage변수를 1로 바꿔 커널에 모듈이 들어 왔다는 것을 알리고 classpointer &my_sched_class를 넣어줌으로써 모듈에서 classpointer를 가지고 내가 만들 스케줄러를 활용 할 수 있게 되었다. 그 활용은 뒤에 기술할 것이다. 그리고 커널에서 EXPORT한 변수 fair_sched_class.next &my_sched_class로 해줘 결과적으로는 fair클래스와 idle클래스 사이에 내가 만든 클래스를 넣게 된 것이다. 마지막으로 exit함수에서는 이와 반대로 해서 모듈이 빠져나갈 때의 설정을 해주었다.


<그림5 \home\ubuntu\v4.10\kernel\sched\mysched\test.c>


위의 그림은 유저프로그램의 코드인 test.c인데 여기서 policySCHED_MYFIFO로 지정해주syscall(314,getpid(),&attr,0)를 호출하여 내 스케줄러를 사용하여 이 프로세를 실행시켜주는 것이다. 314sched_setattr() 시스템호출함수의 함수 번호이고 SCHED_MYFIFO는 내 스케줄러를 사용하겠다라고 지정해 줄려고 쓰는 상수인데 이 선언은 다음 나오는 그림6에 선어되어있다.


<그림6 home\ubuntu\v4.10\include\uapi\linux\sched.h>

저렇게 임의로 7로 선언해주었다.


마지막으로는 sched_setattr()함수를 호출하였으며 그 경로를 따라 코드를 바꿔주어 내 스케줄러에 프로세스가 잘 들어가 동작하는지를 확인하여야 한다. 일단 결론부터 말하자면 실패하였다. 그래도 내가 시도했던 것을 설명하려고 한다.


<그림7 home\ubuntu\v4.10\kernel\sched\sched.h>


일단 내 스케줄러는 validpolicy로 인식해주기 위하여 원래 커널코드의 형식에 맞춰myfifo_policy라는 함수를 만들어주어 valid_policy의 리턴값에 || 연산으로 추가하여 제대로 인식되게 만들어 주었다.


<그림8 home\ubuntu\v4.10\kernel\sched\core.c>


일단 syscalls.h를 보면 sched_setattr() 이 함수가 #define SYSCALL_DEFINE3라는 매크로함수로 되어 있는 것을 알 수 있다. 그래서 core.c에서 찾아본결과 SYSCALL_DEFINE3(sched_setscheduler, pid_t, pid, int, policy, struct sched_param __user *, param) 이런 함수를 발견 하였고 이 함수를 시점으로 하여 계속 따라간 결과 sched_setattr -> __sched_setscheduler -> __setscheduler -> __setscheduler_params 그리하여 위에 나오는 그림처럼 코드를 추가하였다. 우선 mysched_usage1이면 모듈이 들어왔다는 것이므로 이것과 policySCHED_MYFIFO가 되면 즉 내가 만든 스케줄러로 지정이 되면 p지금 수행하고 있는 작업의 sched_classclasspointer로 지정해주었다. Classpointer 아까 모듈에서 &my_sched_class로 지정해주었기 때문에 결론적으로 말하면 내가 만들 스케줄러로 바꿔준다는 뜻이다.


<그림9 insmod/rmmod mysched.ko>


하지만 위 그림과 같이 모듈이 들어갔다 나왔다는 잘 되었지만 ./test 프로그램을 실행하여도 dmesg에 내 스케줄러가 잘 동작하는지에 대한 결과가 출력되지 않았다.


깃허브

https://github.com/icd0422/Modifying-the-Linux-CPU-scheduling-structure


icd0422/Modifying-the-Linux-CPU-scheduling-structure

Contribute to icd0422/Modifying-the-Linux-CPU-scheduling-structure development by creating an account on GitHub.

github.com


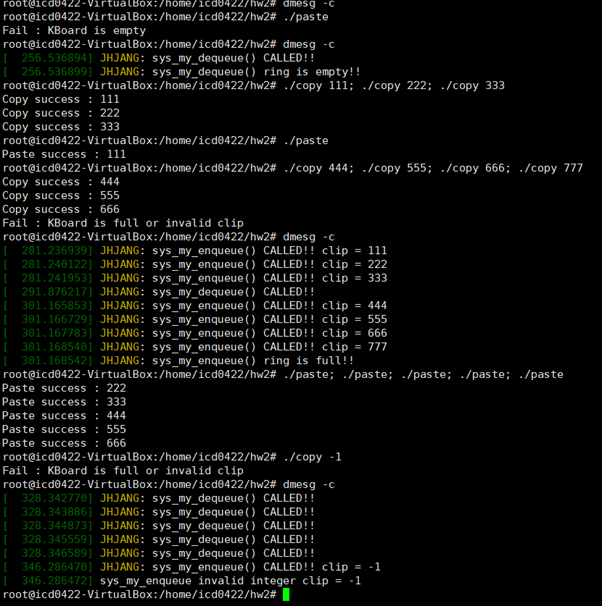
<그림1 유저 프로그램 결과>


소스코드

</home/icd0422/v4.10/arch/x86/entry/syscalls/syscall_64.tbl>


</home/icd0422/v4.10/include/linux/syscall.h>


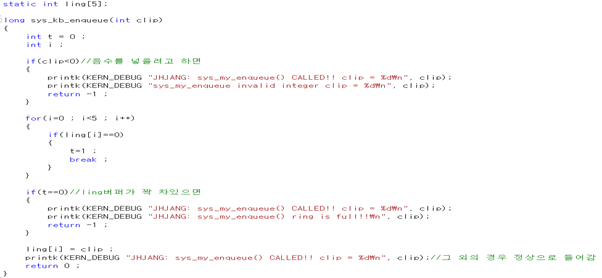
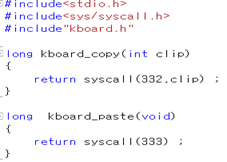
</home/icd0422/v4.10/kernel/os_kboard.c>


<home/icd0422/v4.10/Makefile>


<kboard.c>


<copy.c>
<paste.c>


문제점 및 해결방안
 
우선 첫번째로 부딪힌 난관은 구조를 파악하는 거였다. 이론적으로만 유저모드와 커널모드를 배웠지 실제적으로 커널모드에 있는 코드를 바꿔서 컴파일하고 설치하는 것은 처음이라 과제설명서에 나와 있는 코드들의 구조를 파악하면서 그것을 바꾸면서 머리속으로 이해하는 것이 힘들었다.  두번째로는 os_kboard.c를 고치고 나서 시스템을 재부팅 안해서 생기는 문제였다. 이때까지는 아무것도 모르고 계속 바꿨는데 왜 안되지 이러면서 애 먹었다 재부팅하고 나니까 적용 되니까 허무했다.  마지막으로는 ring버퍼를 큐 구조로 만들어야 된다는 것이었다. 일반 c프로그래밍이면 큐를 이용하면 되지만 커널모드에서 코드를 짤때는 큐를 이용하지 못하여 생각 끝에 그냥 앞에 있는 원소가 빠지면 그 뒤에 있는 원소를 앞으로 다 일일히 옮겨서 해결하였다. 


깃허브

https://github.com/icd0422/kernel-level-clipboard-service


icd0422/kernel-level-clipboard-service

Contribute to icd0422/kernel-level-clipboard-service development by creating an account on GitHub.

github.com


+ Recent posts