MainActivity
|
1
2
3
4
5
6
7
8
9
10
11
12
13
14
15
16
17
18
19
20
21
22
23
24
25
26
27
28
29
30
31
32
33
34
35
36
37
38
39
40
41
42
43
44
45
46
47
48
49
50
51
52
53
54
55
56
57
58
59
60
61
62
63
64
65
66
67
68
69
70
71
72
73
74
75
76
77
78
79
80
81
82
83
84
85
86
87
88
89
90
91
92
93
94
95
96
97
98
99
100
101
102
103
104
105
106
107
108
109
110
111
112
113
|
package com.example.test;
import androidx.appcompat.app.AppCompatActivity;
import android.os.Bundle;
import android.view.View;
import android.view.ViewGroup;
import android.widget.AdapterView;
import android.widget.BaseAdapter;
import android.widget.Button;
import android.widget.EditText;
import android.widget.ListView;
import android.widget.Toast;
import java.util.ArrayList;
public class MainActivity extends AppCompatActivity {
SingerAdapter adapter;
EditText nameEdit;
EditText mobileEdit;
Button button ;
@Override
protected void onCreate(Bundle savedInstanceState) {
super.onCreate(savedInstanceState);
setContentView(R.layout.activity_main);
ListView listView = (ListView) findViewById(R.id.lv);
nameEdit = (EditText) findViewById(R.id.name_edit);
mobileEdit = (EditText) findViewById(R.id.mobile_edit);
button = (Button) findViewById(R.id.button);
adapter = new SingerAdapter();
adapter.addItem(new SingerItem("장주느", "010-5212-7024", R.drawable.ic_launcher_background));
adapter.addItem(new SingerItem("장주느1", "010-52024", R.drawable.ic_launcher_background));
adapter.addItem(new SingerItem("장주느2", "010-51-7024", R.drawable.ic_launcher_background));
adapter.addItem(new SingerItem("장주느3", "0-5-7024", R.drawable.ic_launcher_background));
adapter.addItem(new SingerItem("장주4", "010-59-7024", R.drawable.ic_launcher_background));
adapter.addItem(new SingerItem("장주5", "-52 -7024", R.drawable.ic_launcher_background));
listView.setAdapter(adapter);
listView.setOnItemClickListener(new AdapterView.OnItemClickListener() {
@Override
public void onItemClick(AdapterView<?> adapterView, View view, int i, long l) {
SingerItem item = (SingerItem) adapter.getItem(i);
Toast.makeText(getApplicationContext(), item.toString(), Toast.LENGTH_LONG).show();
}
});
button.setOnClickListener(new View.OnClickListener() {
@Override
public void onClick(View view) {
String name = nameEdit.getText().toString();
String mobile = mobileEdit.getText().toString();
SingerItem item = new SingerItem(name, mobile, R.drawable.ic_launcher_foreground);
adapter.addItem(item);
adapter.notifyDataSetChanged();
}
});
}
class SingerAdapter extends BaseAdapter
{
ArrayList<SingerItem> items = new ArrayList<SingerItem>() ;
public void addItem(SingerItem item)
{
items.add(item);
}
@Override
public int getCount() {
return items.size();
}
@Override
public Object getItem(int i) {
return items.get(i);
}
@Override
public long getItemId(int i) {
return i;
}
@Override
public View getView(int i, View view, ViewGroup viewGroup) {
SingerItemView singerItemView = null ;
if(view == null)
{
singerItemView = new SingerItemView(getApplicationContext());
}
else
{
singerItemView = (SingerItemView) view;
}
SingerItem item = items.get(i) ;
singerItemView.setName(item.getName());
singerItemView.setMobile(item.getMobile());
singerItemView.setImg(item.getResID());
return singerItemView;
}
}
}
|
cs |
SingerItem
|
1
2
3
4
5
6
7
8
9
10
11
12
13
14
15
16
17
18
19
20
21
22
23
24
25
26
27
28
29
30
31
32
33
34
35
36
|
package com.example.test;
public class SingerItem {
private String name ;
private String mobile ;
private int resID ;
public SingerItem(String name, String mobile, int resID) {
this.name = name;
this.mobile = mobile;
this.resID = resID ;
}
public String getName() {
return name;
}
public String getMobile() {
return mobile;
}
public int getResID()
{
return resID ;
}
@Override
public String toString() {
return "SingerItem{" +
"name='" + name + '\'' +
", mobile='" + mobile + '\'' +
", resID=" + resID +
'}';
}
}
|
cs |
SingerItemView
|
1
2
3
4
5
6
7
8
9
10
11
12
13
14
15
16
17
18
19
20
21
22
23
24
25
26
27
28
29
30
31
32
33
34
35
36
37
38
39
40
41
42
43
44
45
46
47
48
49
50
51
52
53
|
package com.example.test;
import android.content.Context;
import android.util.AttributeSet;
import android.view.LayoutInflater;
import android.widget.ImageView;
import android.widget.LinearLayout;
import android.widget.TextView;
public class SingerItemView extends LinearLayout {
TextView textView;
TextView textView2;
ImageView img;
public SingerItemView(Context context) {
super(context);
init(context);
}
public SingerItemView(Context context, AttributeSet attrs) {
super(context, attrs);
init(context);
}
private void init(Context context)
{
LayoutInflater inflater = (LayoutInflater) context.getSystemService(Context.LAYOUT_INFLATER_SERVICE);
inflater.inflate(R.layout.singer_item_view, this, true);
///아래의 방식으로도 인플레이트 할 수 있다.
//View.inflate(getContext() ,R.layout.singer_item_view, this);
textView = findViewById(R.id.tv);
textView2 = findViewById(R.id.tv2) ;
img = findViewById(R.id.img) ;
}
public void setName(String name)
{
textView.setText(name);
}
public void setMobile(String mobile)
{
textView2.setText(mobile);
}
public void setImg(int resID)
{
img.setImageResource(resID);
}
}
|
cs |
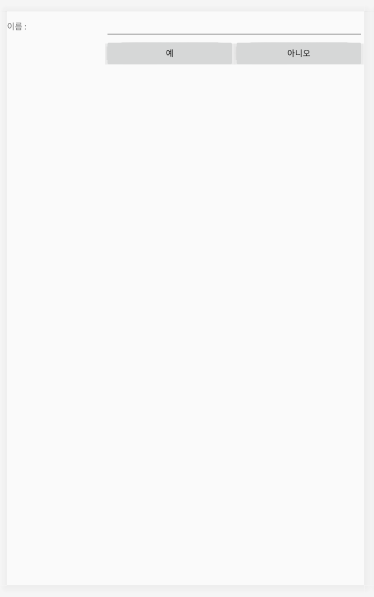
activity_main.xml
|
1
2
3
4
5
6
7
8
9
10
11
12
13
14
15
16
17
18
19
20
21
22
23
24
25
26
27
28
29
30
31
32
33
34
35
36
37
38
39
40
41
|
<?xml version="1.0" encoding="utf-8"?>
<RelativeLayout xmlns:android="http://schemas.android.com/apk/res/android"
android:layout_width="match_parent"
android:layout_height="match_parent"
android:orientation="vertical" >
<LinearLayout
android:layout_width="match_parent"
android:layout_height="wrap_content"
android:layout_alignParentBottom="false"
android:orientation="vertical">
<Button
android:id="@+id/button"
android:layout_width="match_parent"
android:layout_height="wrap_content"
android:text="추가" />
<EditText
android:id="@+id/name_edit"
android:layout_width="match_parent"
android:layout_height="wrap_content"
android:ems="10"
android:hint="이름"
android:inputType="textPersonName" />
<EditText
android:id="@+id/mobile_edit"
android:layout_width="match_parent"
android:layout_height="wrap_content"
android:ems="10"
android:hint="전화번호"
android:inputType="textPersonName" />
<ListView
android:id="@+id/lv"
android:layout_width="match_parent"
android:layout_height="match_parent"
/>
</LinearLayout>
</RelativeLayout>
|
cs |
singer_item_view.xml
|
1
2
3
4
5
6
7
8
9
10
11
12
13
14
15
16
17
18
19
20
21
22
23
24
25
26
27
28
29
30
31
32
33
34
35
36
37
38
|
<?xml version="1.0" encoding="utf-8"?>
<LinearLayout xmlns:android="http://schemas.android.com/apk/res/android"
android:orientation="horizontal"
android:layout_width="match_parent"
android:layout_height="wrap_content">
<ImageView
android:id="@+id/img"
android:layout_width="80dp"
android:layout_height="80dp"
android:src="@mipmap/ic_launcher" />
<LinearLayout
android:layout_width="match_parent"
android:layout_height="match_parent"
android:layout_marginLeft="6dp"
android:orientation="vertical">
<TextView
android:id="@+id/tv"
android:layout_width="match_parent"
android:layout_height="wrap_content"
android:text="이름"
android:textColor="@color/colorPrimaryDark"
android:textSize="30dp" />
<TextView
android:id="@+id/tv2"
android:layout_width="match_parent"
android:layout_height="wrap_content"
android:layout_marginTop="6dp"
android:text="전화번호"
android:textColor="@android:color/holo_orange_dark"
android:textSize="24dp" />
</LinearLayout>
</LinearLayout>
|
cs |
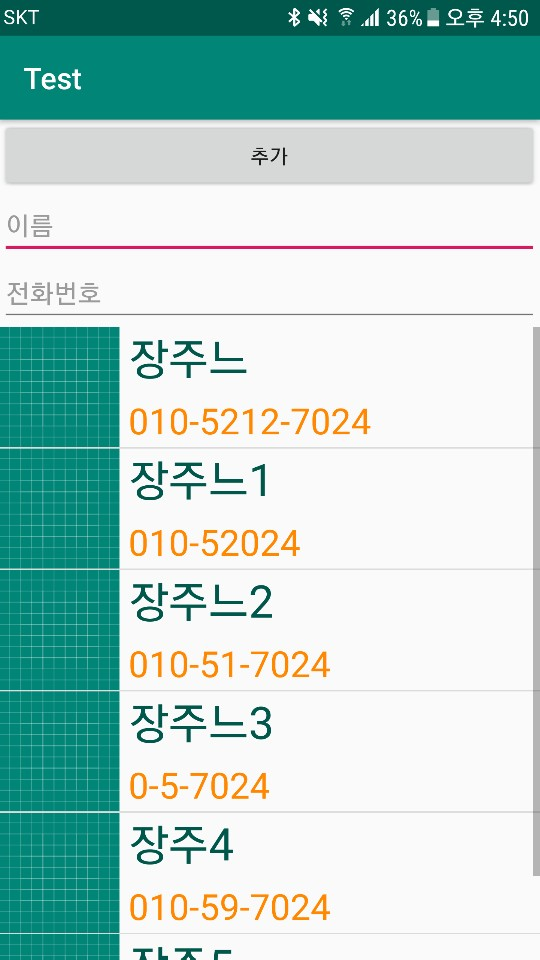
기본 원리는 리스트뷰에 어댑터를 등록하고 어댑터의 안의
ArrayList<SingerItem> items = new ArrayList<SingerItem>() 로 배열을 선언하고
public View getView(int i, View view, ViewGroup viewGroup)을 등록하여 내가 만든 return singerItemView; 을 리턴하여 아이템 항목을 보여주는 식이다.
singerItemView는 singer_item_view.xml과 연결되어 있다.
아래와 같이 클릭리스너를 등록해 리스트의 몇번째 아이템 항목이 선택되었는지를 알수 있다.
listView.setOnItemClickListener(new AdapterView.OnItemClickListener() {
@Override
public void onItemClick(AdapterView<?> adapterView, View view, int i, long l) {
SingerItem item = (SingerItem) adapter.getItem(i);
Toast.makeText(getApplicationContext(), item.toString(), Toast.LENGTH_LONG).show();
}
});
다음은 버튼을 클릭하여 리스트의 아이템 항목을 추가하는 것인데
button.setOnClickListener(new View.OnClickListener() {
@Override
public void onClick(View view) {
String name = nameEdit.getText().toString();
String mobile = mobileEdit.getText().toString();
SingerItem item = new SingerItem(name, mobile, R.drawable.ic_launcher_foreground);
adapter.addItem(item);
adapter.notifyDataSetChanged();
}
});
위처럼 adapter.notifyDataSetChanged(); 를 호출하여 어댑터에 변화가 있다고 알려줘야 한다.
마지막으로
public View getView(int i, View view, ViewGroup viewGroup) {
SingerItemView singerItemView = null ;
if(view == null)
{
singerItemView = new SingerItemView(getApplicationContext());
}
else
{
singerItemView = (SingerItemView) view;
}
getView에서 view가 null이 아닐 때 즉 이전에 썼던 객체가 남아있을 때 객체를 더이상 생성하지 않고 재활용하여 객체가 생성되는 수를 줄여 빠르게 만들어 줄 수 있다.
'2019 summer 부스트코스 에이스(안드로이드 프로그래밍) > 2. 이벤트와 리스트뷰' 카테고리의 다른 글
| 2-3-2 알림 대화 상자 보여주기 (0) | 2019.07.30 |
|---|---|
| 2-3-1 토스트 보여주기 (0) | 2019.07.30 |
| 2-2-1 이벤트 처리 이해하기 (0) | 2019.07.21 |
| 2-1-2 스크롤뷰 (0) | 2019.07.20 |
| 2-1-1 테이블 레이아웃 (0) | 2019.07.19 |