MainActivity

...더보기
1
2
3
4
5
6
7
8
9
10
11
12
13
14
15
16
17
18
19
20
21
22
23
24
25
26
27
28
29
30
31
32
33
34
35
36
37
38
39
40
41
42
43
44
45
46
47
48
49
50
51
52
53
54
55
56
57
58
59
60
61
62
63
64
65
66
67
68
package com.example.boostcoursepractice;
 
import androidx.appcompat.app.AppCompatActivity;
 
import android.os.Bundle;
import android.view.Gravity;
import android.view.LayoutInflater;
import android.view.View;
import android.view.ViewGroup;
import android.widget.Button;
import android.widget.TextView;
import android.widget.Toast;
 
import com.google.android.material.snackbar.Snackbar;
 
public class MainActivity extends AppCompatActivity {
 
    Button btn ;
    Button btn2 ;
    Button btn3 ;
 
    @Override
    protected void onCreate(Bundle savedInstanceState) {
        super.onCreate(savedInstanceState);
        setContentView(R.layout.activity_main);
 
        btn = (Button) findViewById(R.id.button);
 
        btn.setOnClickListener(new View.OnClickListener() {
            @Override
            public void onClick(View view) {
                Toast toast = Toast.makeText(getApplicationContext(), "위치가 바뀐 토스트 메세지", Toast.LENGTH_LONG) ;
                toast.setGravity(Gravity.TOP | Gravity.LEFT, 200200);
                toast.show();
            }
        });
 
        btn2 = (Button) findViewById(R.id.button2);
 
        btn2.setOnClickListener(new View.OnClickListener() {
            @Override
            public void onClick(View view) {
                LayoutInflater layoutInflater = getLayoutInflater();
                View layout = layoutInflater.inflate(R.layout.toastborder, (ViewGroup)findViewById(R.id.toast_layout_root));
 
                TextView text = (TextView) layout.findViewById(R.id.tv);
                text.setText("모양을 바꾼 토스트입니다.");
 
                Toast toast = new Toast(getApplicationContext());
                toast.setGravity(Gravity.CENTER, 0-100);
                toast.setDuration(Toast.LENGTH_LONG);
                toast.setView(layout);
 
                toast.show();
            }
        });
 
        btn3 = (Button) findViewById(R.id.button3);
 
        btn3.setOnClickListener(new View.OnClickListener() {
            @Override
            public void onClick(View view) {
                Snackbar.make(view, "스낵바 입니다.", Snackbar.LENGTH_LONG).show();
            }
        });
    }
}
 
cs


drawble/toast.xml

...더보기
1
2
3
4
5
6
7
8
9
10
11
12
13
14
15
16
17
18
19
20
<?xml version="1.0" encoding="utf-8"?>
<shape xmlns:android="http://schemas.android.com/apk/res/android"
    android:shape="rectangle">
 
    <stroke
        android:width="4dp"
        android:color="#ffffff00"/>
 
    <solid
        android:color="#ff883300" />
 
    <padding
        android:left="20dp"
        android:bottom="20dp"
        android:right="20dp"
        android:top="20dp"/>
 
    <corners
        android:radius="15dp"/>
</shape>
cs


layout/activity_main.xml

...더보기
1
2
3
4
5
6
7
8
9
10
11
12
13
14
15
16
17
18
19
20
21
22
23
24
25
26
27
28
29
30
31
32
33
34
35
36
37
38
39
40
41
42
43
44
<?xml version="1.0" encoding="utf-8"?>
<androidx.constraintlayout.widget.ConstraintLayout xmlns:android="http://schemas.android.com/apk/res/android"
    xmlns:app="http://schemas.android.com/apk/res-auto"
    xmlns:tools="http://schemas.android.com/tools"
    android:layout_width="match_parent"
    android:layout_height="match_parent"
    tools:context=".MainActivity">
 
    <Button
        android:id="@+id/button"
        android:layout_width="wrap_content"
        android:layout_height="wrap_content"
        android:text="토스트 띄우기"
        app:layout_constraintBottom_toBottomOf="parent"
        app:layout_constraintEnd_toEndOf="parent"
        app:layout_constraintStart_toStartOf="parent"
        app:layout_constraintTop_toTopOf="parent" />
 
    <Button
        android:id="@+id/button2"
        android:layout_width="wrap_content"
        android:layout_height="wrap_content"
        android:layout_marginStart="8dp"
        android:layout_marginLeft="8dp"
        android:layout_marginTop="56dp"
        android:layout_marginEnd="8dp"
        android:layout_marginRight="8dp"
        android:text="토스트 모양 바꾸기"
        app:layout_constraintEnd_toEndOf="parent"
        app:layout_constraintHorizontal_bias="0.498"
        app:layout_constraintStart_toStartOf="parent"
        app:layout_constraintTop_toBottomOf="@+id/button" />
 
    <Button
        android:id="@+id/button3"
        android:layout_width="wrap_content"
        android:layout_height="wrap_content"
        android:layout_marginTop="48dp"
        android:text="스낵바 띄우기"
        app:layout_constraintEnd_toEndOf="parent"
        app:layout_constraintHorizontal_bias="0.498"
        app:layout_constraintStart_toStartOf="parent"
        app:layout_constraintTop_toBottomOf="@+id/button2" />
</androidx.constraintlayout.widget.ConstraintLayout>
cs


layout/toastborder.xml

...더보기
1
2
3
4
5
6
7
8
9
10
11
12
13
14
15
16
<?xml version="1.0" encoding="utf-8"?>
<LinearLayout xmlns:android="http://schemas.android.com/apk/res/android"
    android:id="@+id/toast_layout_root"
    android:layout_width="wrap_content"
    android:layout_height="wrap_content"
    android:orientation="horizontal">
 
 
    <TextView
        android:id="@+id/tv"
        android:layout_width="wrap_content"
        android:layout_height="wrap_content"
        android:background="@drawable/toast"
        android:padding="20dp"
        android:textSize="40dp" />
</LinearLayout>
cs


build.gradle(Moudule:app)

...더보기

apply plugin: 'com.android.application'

android {
compileSdkVersion 29
buildToolsVersion "29.0.0"
defaultConfig {
applicationId "com.example.boostcoursepractice"
minSdkVersion 15
targetSdkVersion 29
versionCode 1
versionName "1.0"
testInstrumentationRunner "androidx.test.runner.AndroidJUnitRunner"
}
buildTypes {
release {
minifyEnabled false
proguardFiles getDefaultProguardFile('proguard-android-optimize.txt'), 'proguard-rules.pro'
}
}
}

dependencies {
implementation fileTree(dir: 'libs', include: ['*.jar'])
implementation 'androidx.appcompat:appcompat:1.0.2'
implementation 'androidx.constraintlayout:constraintlayout:1.1.3'
testImplementation 'junit:junit:4.12'
androidTestImplementation 'androidx.test:runner:1.2.0'
androidTestImplementation 'androidx.test.espresso:espresso-core:3.2.0'
compile 'com.android.support:design:29.+'
}


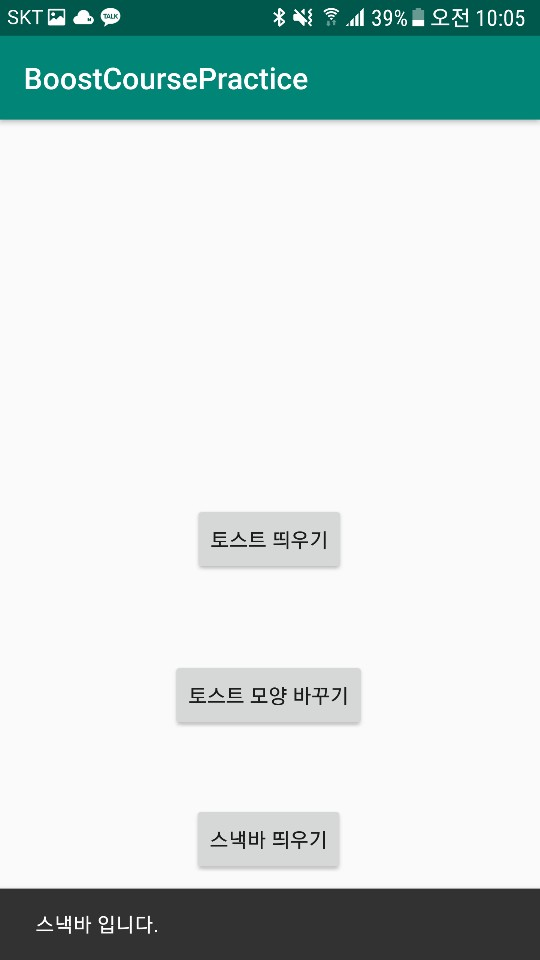
기본적으로 Toast 메세지를 띄우는 방법


Toast toast = Toast.makeText(getApplicationContext(), "위치가 바뀐 토스트 메세지", Toast.LENGTH_LONG) ;


여기서 토스트의 위치를 바꾸려면 


toast.setGravity(Gravity.TOP | Gravity.LEFT, 200200);


이렇게 하면 된다. 마지막에 toast.show() 하면 토스트 출력


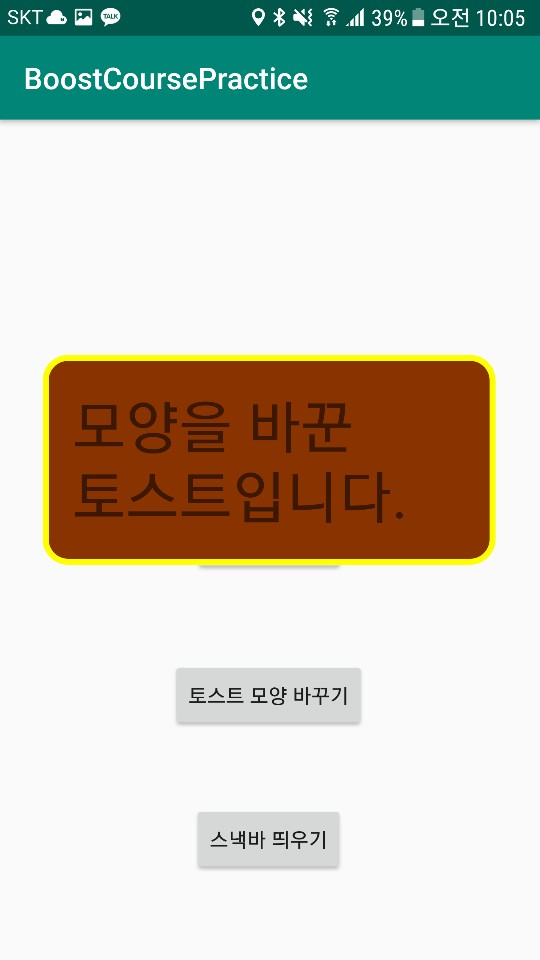
토스트의 모양을 바꿔주려면 일단 layout폴더에 xml파일을 만들어주자 여기서는 layout/toastborder.xml을 만들어 주었다. 후에 최상의 뷰그룹인 LinearLayout에 id를 부여한다. 여기서는 android:id="@+id/toast_layout_root 부여 이후에 다시 mainactiviy의 소스코드로 돌아와서 


 LayoutInflater layoutInflater = getLayoutInflater();

                View layout = layoutInflater.inflate(R.layout.toastborder, (ViewGroup)findViewById(R.id.toast_layout_root));


                TextView text = (TextView) layout.findViewById(R.id.tv);

                text.setText("모양을 바꾼 토스트입니다.");


                Toast toast = new Toast(getApplicationContext());

                toast.setGravity(Gravity.CENTER, 0-100);

                toast.setDuration(Toast.LENGTH_LONG);

                toast.setView(layout);


                toast.show();


이처럼 해주면 된다. 


추가적으로 

drawble/toast라는 xml을 파일을 만든후 배경을 만들어주고 

layout/toastborder.xml의 TextView에 android:background="@drawable/toast" 이렇게 백그라운드 속성을 지정해주어 모양을 바꾼 토스트 메세지의 배경을 바꾸어 주었다.


스낵바의 사용은 아래와 같이 하면 된다.

Snackbar.make(view, "스낵바 입니다.", Snackbar.LENGTH_LONG).show();

단 gradle의 dependencies에 

compile 'com.android.support:design:29.+' 

를 추가해줘야만 사용할 수 있다.


버튼1


버튼2


버튼3


MainActivity

...더보기
1
2
3
4
5
6
7
8
9
10
11
12
13
14
15
16
17
18
19
20
21
22
23
24
25
26
27
28
29
30
31
32
33
34
35
36
37
38
39
40
41
42
43
44
45
46
47
48
49
50
51
52
53
54
55
56
57
58
59
60
61
62
63
64
65
66
67
68
69
70
71
72
73
74
75
76
77
78
79
80
81
82
83
84
85
86
87
88
89
90
91
92
93
94
95
96
97
98
99
100
101
102
103
104
105
106
107
108
109
110
111
112
113
package com.example.test;
 
import androidx.appcompat.app.AppCompatActivity;
 
import android.os.Bundle;
import android.view.View;
import android.view.ViewGroup;
import android.widget.AdapterView;
import android.widget.BaseAdapter;
import android.widget.Button;
import android.widget.EditText;
import android.widget.ListView;
import android.widget.Toast;
 
import java.util.ArrayList;
 
public class MainActivity extends AppCompatActivity {
 
    SingerAdapter adapter;
    EditText nameEdit;
    EditText mobileEdit;
    Button button ;
 
    @Override
    protected void onCreate(Bundle savedInstanceState) {
        super.onCreate(savedInstanceState);
        setContentView(R.layout.activity_main);
 
        ListView listView = (ListView) findViewById(R.id.lv);
        nameEdit = (EditText) findViewById(R.id.name_edit);
        mobileEdit = (EditText) findViewById(R.id.mobile_edit);
        button = (Button) findViewById(R.id.button);
 
        adapter = new SingerAdapter();
 
        adapter.addItem(new SingerItem("장주느""010-5212-7024", R.drawable.ic_launcher_background));
        adapter.addItem(new SingerItem("장주느1""010-52024", R.drawable.ic_launcher_background));
        adapter.addItem(new SingerItem("장주느2""010-51-7024", R.drawable.ic_launcher_background));
        adapter.addItem(new SingerItem("장주느3""0-5-7024", R.drawable.ic_launcher_background));
        adapter.addItem(new SingerItem("장주4""010-59-7024", R.drawable.ic_launcher_background));
        adapter.addItem(new SingerItem("장주5""-52 -7024", R.drawable.ic_launcher_background));
 
 
        listView.setAdapter(adapter);
        listView.setOnItemClickListener(new AdapterView.OnItemClickListener() {
            @Override
            public void onItemClick(AdapterView<?> adapterView, View view, int i, long l) {
                SingerItem item = (SingerItem) adapter.getItem(i);
                Toast.makeText(getApplicationContext(), item.toString(), Toast.LENGTH_LONG).show();
            }
        });
 
        button.setOnClickListener(new View.OnClickListener() {
            @Override
            public void onClick(View view) {
                String name = nameEdit.getText().toString();
                String mobile = mobileEdit.getText().toString();
 
                SingerItem item = new SingerItem(name, mobile, R.drawable.ic_launcher_foreground);
 
                adapter.addItem(item);
                adapter.notifyDataSetChanged();
            }
        });
    }
 
    class SingerAdapter extends BaseAdapter
    {
        ArrayList<SingerItem> items = new ArrayList<SingerItem>() ;
 
        public void addItem(SingerItem item)
        {
            items.add(item);
        }
 
        @Override
        public int getCount() {
            return items.size();
        }
 
        @Override
        public Object getItem(int i) {
            return items.get(i);
        }
 
        @Override
        public long getItemId(int i) {
            return i;
        }
 
        @Override
        public View getView(int i, View view, ViewGroup viewGroup) {
            SingerItemView singerItemView = null ;
 
            if(view == null)
            {
                 singerItemView = new SingerItemView(getApplicationContext());
            }
            else
            {
                singerItemView = (SingerItemView) view;
            }
 
            SingerItem item = items.get(i) ;
            singerItemView.setName(item.getName());
            singerItemView.setMobile(item.getMobile());
            singerItemView.setImg(item.getResID());
 
            return singerItemView;
        }
    }
 
}
cs


SingerItem

...더보기
1
2
3
4
5
6
7
8
9
10
11
12
13
14
15
16
17
18
19
20
21
22
23
24
25
26
27
28
29
30
31
32
33
34
35
36
package com.example.test;
 
public class SingerItem {
    private String name ;
    private String mobile ;
    private int resID ;
 
    public SingerItem(String name, String mobile, int resID) {
        this.name = name;
        this.mobile = mobile;
        this.resID = resID ;
    }
 
    public String getName() {
        return name;
    }
 
    public String getMobile() {
        return mobile;
    }
 
    public int getResID()
    {
        return resID ;
    }
 
    @Override
    public String toString() {
        return "SingerItem{" +
                "name='" + name + '\'' +
                ", mobile='" + mobile + '\'' +
                ", resID=" + resID +
                '}';
    }
}
 
cs


SingerItemView

...더보기
1
2
3
4
5
6
7
8
9
10
11
12
13
14
15
16
17
18
19
20
21
22
23
24
25
26
27
28
29
30
31
32
33
34
35
36
37
38
39
40
41
42
43
44
45
46
47
48
49
50
51
52
53
package com.example.test;
 
import android.content.Context;
import android.util.AttributeSet;
import android.view.LayoutInflater;
import android.widget.ImageView;
import android.widget.LinearLayout;
import android.widget.TextView;
 
public class SingerItemView extends LinearLayout {
 
    TextView textView;
    TextView textView2;
    ImageView img;
 
    public SingerItemView(Context context) {
        super(context);
 
        init(context);
    }
 
    public SingerItemView(Context context, AttributeSet attrs) {
        super(context, attrs);
 
        init(context);
    }
 
    private void init(Context context)
    {
        LayoutInflater inflater = (LayoutInflater) context.getSystemService(Context.LAYOUT_INFLATER_SERVICE);
        inflater.inflate(R.layout.singer_item_view, thistrue);
 
///아래의 방식으로도 인플레이트 할 수 있다.
//View.inflate(getContext() ,R.layout.singer_item_view, this);
 
        textView = findViewById(R.id.tv);
        textView2 = findViewById(R.id.tv2) ;
        img = findViewById(R.id.img) ;
    }
 
    public void setName(String name)
    {
        textView.setText(name);
    }
 
    public void setMobile(String mobile)
    {
        textView2.setText(mobile);
    }
 
    public void setImg(int resID)
    {
        img.setImageResource(resID);
    }
}
 
cs


activity_main.xml

...더보기
1
2
3
4
5
6
7
8
9
10
11
12
13
14
15
16
17
18
19
20
21
22
23
24
25
26
27
28
29
30
31
32
33
34
35
36
37
38
39
40
41
<?xml version="1.0" encoding="utf-8"?>
<RelativeLayout xmlns:android="http://schemas.android.com/apk/res/android"
    android:layout_width="match_parent"
    android:layout_height="match_parent"
    android:orientation="vertical" >
 
    <LinearLayout
        android:layout_width="match_parent"
        android:layout_height="wrap_content"
        android:layout_alignParentBottom="false"
        android:orientation="vertical">
 
        <Button
            android:id="@+id/button"
            android:layout_width="match_parent"
            android:layout_height="wrap_content"
            android:text="추가" />
 
        <EditText
            android:id="@+id/name_edit"
            android:layout_width="match_parent"
            android:layout_height="wrap_content"
            android:ems="10"
            android:hint="이름"
            android:inputType="textPersonName" />
 
        <EditText
            android:id="@+id/mobile_edit"
            android:layout_width="match_parent"
            android:layout_height="wrap_content"
            android:ems="10"
            android:hint="전화번호"
            android:inputType="textPersonName" />
 
        <ListView
            android:id="@+id/lv"
            android:layout_width="match_parent"
            android:layout_height="match_parent"
            />
    </LinearLayout>
</RelativeLayout>
cs


singer_item_view.xml

...더보기
1
2
3
4
5
6
7
8
9
10
11
12
13
14
15
16
17
18
19
20
21
22
23
24
25
26
27
28
29
30
31
32
33
34
35
36
37
38
<?xml version="1.0" encoding="utf-8"?>
<LinearLayout xmlns:android="http://schemas.android.com/apk/res/android"
    android:orientation="horizontal"
    android:layout_width="match_parent"
    android:layout_height="wrap_content">
 
    <ImageView
        android:id="@+id/img"
        android:layout_width="80dp"
        android:layout_height="80dp"
        android:src="@mipmap/ic_launcher" />
 
    <LinearLayout
        android:layout_width="match_parent"
        android:layout_height="match_parent"
        android:layout_marginLeft="6dp"
        android:orientation="vertical">
 
        <TextView
            android:id="@+id/tv"
            android:layout_width="match_parent"
            android:layout_height="wrap_content"
            android:text="이름"
            android:textColor="@color/colorPrimaryDark"
            android:textSize="30dp" />
 
        <TextView
            android:id="@+id/tv2"
            android:layout_width="match_parent"
            android:layout_height="wrap_content"
            android:layout_marginTop="6dp"
            android:text="전화번호"
            android:textColor="@android:color/holo_orange_dark"
            android:textSize="24dp" />
 
    </LinearLayout>
 
</LinearLayout>
cs


기본 원리는 리스트뷰에 어댑터를 등록하고 어댑터의 안의

ArrayList<SingerItem> items = new ArrayList<SingerItem>() 로 배열을 선언하고

public View getView(int i, View view, ViewGroup viewGroup)을 등록하여 내가 만든 return singerItemView; 을 리턴하여 아이템 항목을 보여주는 식이다. 


singerItemView는 singer_item_view.xml과 연결되어 있다. 


아래와 같이 클릭리스너를 등록해 리스트의 몇번째 아이템 항목이 선택되었는지를 알수 있다. 

listView.setOnItemClickListener(new AdapterView.OnItemClickListener() {

            @Override

            public void onItemClick(AdapterView<?> adapterView, View view, int i, long l) {

                SingerItem item = (SingerItem) adapter.getItem(i);

                Toast.makeText(getApplicationContext(), item.toString(), Toast.LENGTH_LONG).show();

            }

        });


다음은 버튼을 클릭하여 리스트의 아이템 항목을 추가하는 것인데

  button.setOnClickListener(new View.OnClickListener() {

            @Override

            public void onClick(View view) {

                String name = nameEdit.getText().toString();

                String mobile = mobileEdit.getText().toString();


                SingerItem item = new SingerItem(name, mobile, R.drawable.ic_launcher_foreground);


                adapter.addItem(item);

                adapter.notifyDataSetChanged();

            }

        });

위처럼  adapter.notifyDataSetChanged(); 를 호출하여 어댑터에 변화가 있다고 알려줘야 한다.


마지막으로

 public View getView(int i, View view, ViewGroup viewGroup) {

            SingerItemView singerItemView = null ;


            if(view == null)

            {

                 singerItemView = new SingerItemView(getApplicationContext());

            }

            else

            {

                singerItemView = (SingerItemView) view;

            }

getView에서 view가 null이 아닐 때 즉 이전에 썼던 객체가 남아있을 때 객체를 더이상 생성하지 않고 재활용하여 객체가 생성되는 수를 줄여 빠르게 만들어 줄 수 있다.


결과 화면

1
2
3
4
5
6
7
8
9
10
11
12
13
14
15
16
17
18
19
20
21
22
23
24
25
26
27
28
29
30
31
32
33
34
35
36
37
38
39
40
41
42
43
44
45
46
47
48
49
50
51
52
53
54
55
56
57
58
59
60
61
62
63
64
65
66
67
68
69
70
71
72
73
74
75
76
77
78
79
80
81
82
83
84
85
86
87
88
89
90
91
92
93
94
95
96
97
98
99
100
101
102
103
104
105
106
107
108
109
110
111
112
113
114
package com.example.test;
 
import androidx.appcompat.app.AppCompatActivity;
 
import android.os.Bundle;
import android.view.GestureDetector;
import android.view.KeyEvent;
import android.view.MotionEvent;
import android.view.View;
import android.widget.TextView;
import android.widget.Toast;
 
public class MainActivity extends AppCompatActivity {
 
    TextView logTv;
    GestureDetector detector ;
 
    @Override
    protected void onCreate(Bundle savedInstanceState) {
        super.onCreate(savedInstanceState);
        setContentView(R.layout.activity_main);
 
        logTv = (TextView) findViewById(R.id.tv_log);
        detector = new GestureDetector(thisnew GestureDetector.OnGestureListener() {
            @Override
            public boolean onDown(MotionEvent motionEvent) {
                println("onDown 호출됨");
                return true;
            }
 
            @Override
            public void onShowPress(MotionEvent motionEvent) {
                println("onShowPress 호출됨");
            }
 
            @Override
            public boolean onSingleTapUp(MotionEvent motionEvent) {
                println("onSingleTapUp 호출됨");
                return true;
            }
 
            @Override
            public boolean onScroll(MotionEvent motionEvent, MotionEvent motionEvent1, float v, float v1) {
                println("onScroll 호출됨 " + v + " "+v1);
                return true;
            }
 
            @Override
            public void onLongPress(MotionEvent motionEvent) {
                println("onLongPress 호출됨");
            }
 
            @Override
            public boolean onFling(MotionEvent motionEvent, MotionEvent motionEvent1, float v, float v1) {
                println("onFling 호출됨" + v + " " + v1);
                return true;
            }
        });
 
        View view = findViewById(R.id.view) ;
        View view2 = findViewById(R.id.view2) ;
 
        view.setOnTouchListener(new View.OnTouchListener() {
            @Override
            public boolean onTouch(View view, MotionEvent motionEvent) {
                int action = motionEvent.getAction() ;
                float curX = motionEvent.getX() ;
                float cuxY = motionEvent.getY() ;
 
                if(action == MotionEvent.ACTION_DOWN)
                {
                    println("손가락 눌렸음 " + curX + " " + cuxY) ;
                }
 
                else if(action == MotionEvent.ACTION_MOVE)
                {
                    println("손가락 움직임 " + curX + " " + cuxY) ;
                }
 
                else if(action == MotionEvent.ACTION_UP)
                {
                    println("손가락 떼짐 " + curX + " " + cuxY) ;
                }
                return true;
            }
        });
 
        view2.setOnTouchListener(new View.OnTouchListener() {
            @Override
            public boolean onTouch(View view, MotionEvent motionEvent) {
                detector.onTouchEvent(motionEvent);
                return true;
            }
        });
    }
 
    public void println(String s)
    {
        logTv.append(s + "\n");
    }
 
    @Override
    public boolean onKeyDown(int keyCode, KeyEvent event) {
        if(keyCode == KeyEvent.KEYCODE_BACK)
        {
            Toast.makeText(this"back키가 눌렸습니다.", Toast.LENGTH_LONG).show();
 
            return true;
        }
 
        return false ;
    }
}
 
cs


view.setOnTouchListener(new View.OnTouchListener() {

            @Override

            public boolean onTouch(View view, MotionEvent motionEvent) {

        });


기본적으로 뷰의 터치 이벤트를 등록하는 방법이다. 리스너안의 onTouch메서드를 오버라이드 해주면 된다.


detector = new GestureDetector(thisnew GestureDetector.OnGestureListener() {

            @Override

            public boolean onDown(MotionEvent motionEvent) {

            }


            @Override

            public void onShowPress(MotionEvent motionEvent) {

            }


            @Override

            public boolean onSingleTapUp(MotionEvent motionEvent) {

            }


            @Override

            public boolean onScroll(MotionEvent motionEvent, MotionEvent motionEvent1, float v, float v1) {

            }


            @Override

            public void onLongPress(MotionEvent motionEvent) {

            }


            @Override

            public boolean onFling(MotionEvent motionEvent, MotionEvent motionEvent1, float v, float v1) {

            }

        });


터치 스크롤을 얼마나 빠르게 했나 등 세부적인 동작을 쉽게 해주는 클래스인 GestureDetector이다. 위 처럼 제스처디덱터의 객체를 만들어 주고 리스너를 등록해 메서드를 오버라이드 해준다. onFling의 v, v1은 속도를 나타낸다.

  view2.setOnTouchListener(new View.OnTouchListener() {

            @Override

            public boolean onTouch(View view, MotionEvent motionEvent) {

                detector.onTouchEvent(motionEvent);

                return true;

            }

        });

마지막으로 터치리스너의 onTouch메서드에 detector.onTouchEvent 메서드에 motionEvent를 넘겨 제스처를 동작시켜준다.


 @Override

    public boolean onKeyDown(int keyCode, KeyEvent event) {

        if(keyCode == KeyEvent.KEYCODE_BACK)

        {

            Toast.makeText(this"back키가 눌렸습니다.", Toast.LENGTH_LONG).show();


            return true;

        }


        return false ;

    }

onKeyDown는 키가 눌렸을 때 호출되는 메소드


마지막으로

1
2
3
4
5
6
7
8
9
10
11
12
13
14
<?xml version="1.0" encoding="utf-8"?>
<selector xmlns:android="http://schemas.android.com/apk/res/android">
 
<item
    android:state_focused="true"
    android:state_pressed="true"
    android:drawable="@drawable/red"
    />
 
<item
    android:drawable="@drawable/blue"
    />
 
</selector>
cs

이처럼 drawble폴더에 my_selecter.xml과 같이 xml파일을 만들어 selector를 이용해 foucused, pressed가 true일 때 즉 뷰가 눌렸을 때의 이미지와 보통 상태일 때의 이미지를 다르게 설정하고 뷰의 background속성을 @drawable/my_selecter로 지정해주면 동작한다.


1
2
3
4
5
6
7
8
9
10
11
12
13
14
15
16
17
18
19
20
21
22
23
24
25
26
27
28
29
30
31
32
33
34
35
36
37
38
39
40
41
42
43
<?xml version="1.0" encoding="utf-8"?>
<LinearLayout xmlns:android="http://schemas.android.com/apk/res/android"
    android:layout_width="match_parent"
    android:layout_height="match_parent"
    android:orientation="vertical" >
 
    <View
        android:id="@+id/view"
        android:layout_width="match_parent"
        android:layout_height="0dp"
        android:layout_weight="1"
        android:background="@android:color/holo_blue_bright"></View>
 
    <View
        android:id="@+id/view2"
        android:layout_width="match_parent"
        android:layout_height="0dp"
        android:layout_weight="1"
        android:background="@android:color/holo_orange_light"></View>
 
    <ScrollView
        android:id="@+id/view3"
        android:layout_width="match_parent"
        android:layout_height="0dp"
        android:layout_weight="1">
        
        <TextView
            android:id="@+id/tv_log"
            android:layout_width="match_parent"
            android:layout_height="match_parent" />
 
    </ScrollView>
 
    <EditText
        android:id="@+id/editText"
        android:layout_width="match_parent"
        android:layout_height="30dp"
        android:background="@drawable/my_selecter"
        android:ems="10"
        android:inputType="text" />
 
 
</LinearLayout>
cs

결과화면

1
2
3
4
5
6
7
8
9
10
11
12
13
<?xml version="1.0" encoding="utf-8"?>
<LinearLayout xmlns:android="http://schemas.android.com/apk/res/android"
    android:layout_width="match_parent"
    android:layout_height="match_parent"
    android:orientation="vertical" >
 
    <TextView
        android:id="@+id/textView"
        android:layout_width="match_parent"
        android:layout_height="wrap_content"
        android:textSize="80dp"
        android:text="안녕하세요\n안녕하세요\n안녕하세요\n안녕하세요\n안녕하세요\n안녕하세요\n안녕하세요\n안녕하세요\n안녕하세요\n안녕하세요\n안녕하세요\n안녕하세요\n안녕하세요\n안녕하세요\n안녕하세요\n안녕하세요\n안녕하세요\n안녕하세요\n안녕하세요" />
</LinearLayout>
cs


스크롤 뷰로 따로 위젯으로 구현되어 있고 그냥 그 안에 뷰들을 넣으면 된다.

1
2
3
4
5
6
7
8
9
10
11
12
13
14
15
16
17
18
19
20
21
22
23
24
25
26
27
28
29
30
31
32
33
34
35
36
37
38
39
40
41
<?xml version="1.0" encoding="utf-8"?>
<TableLayout xmlns:android="http://schemas.android.com/apk/res/android"
    android:layout_width="match_parent"
    android:layout_height="match_parent"
    android:stretchColumns="0,1,2">
 
    <TableRow
        android:layout_width="match_parent"
        android:layout_height="wrap_content">
 
        <TextView
            android:layout_height="wrap_content"
            android:layout_weight="wrap_content"
            android:text="이름 : " />
 
        <EditText
            android:layout_height="wrap_content"
            android:layout_span="2"
            android:layout_weight="wrap_content" />
 
    </TableRow>
 
    <TableRow
        android:layout_width="match_parent"
        android:layout_height="wrap_content">
 
        <Button
            android:layout_height="wrap_content"
            android:layout_column="1"
            android:layout_weight="wrap_content"
            android:text="예" />
 
        <Button
            android:layout_height="wrap_content"
            android:layout_column="2"
            android:layout_weight="wrap_content"
            android:text="아니오" />
 
    </TableRow>
 
</TableLayout>
cs


기본적으로 TableLayout안에 TableRow로 구성됨


android:stretchColumns="0,1,2" : 0,1,2번 컬럼(뷰)을 나머지 공간에 대하여 늘린다(가로) - 3등분 한다

android:layout_span="2" : 뷰가 2칸 크기만큼을 차지한다.

android:layout_column="1" : 뷰가 1번 칸에 들어간다.


결과 화면

+ Recent posts